• How to Dispose Your Nail Polish Properly

    While finishing last month article about 'say no to formaldehyde, toluene and dbp', a question came to my mind. In the past, I didn't care about what kind of nail polish I'd use, whether it was safe or not. Now, since I'd like to stick with safer nail polish, I want to get rid my old nail polishes I've been collecting. But, would it be alright to just toss them in the trash?

  • Polish that lasts !

    Learn how to improve nail polish application to make it last longer. This article will tell you a great secret from a veteran nail tech on how to apply nail polish the right way.
  • Nail Tips and Tricks from our Readers

    Below are some tips from our readers who generously shared their secrets with us. From recycling your old nail polish, caring your nails in winter time to how to stop nail biting habit.
  • How to buff your nails


    What is buffing all about? What do they look like? What mistakes are commonly made? What are the benefits of buffing? are all the questions that will be answered by this article.

  • How to Apply Nail Rhinestones

    Apply rhinestones on polished nail while still sticky. Arrange nail rhinestones to any design you like. If the polish is already dry when you are still applying your nail rhinestones, apply some top coat. The top coat acts as a bonder. After finishing your design, wait until the polish or top coat dry. Finish with a layer or two of top coat to seal the stones.
    Apply rhinestones on polished nail while still sticky. Arrange nail rhinestones to any design you like. If the polish is already dry when you are still applying your nail rhinestones, apply some top coat. The top coat acts as a bonder. After finishing your design, wait until the polish or top coat dry. Finish with a layer or two of top coat to seal the stones.

  • How to Apply Nail Art Beads

    Using nail art beads (or a.k.a. bullion beads) is another great way to create unique nail art design. Usually you create the new design by arranging the beads according to what you have in mind. Or you can apply around a design, such as heart or line, to emphasize it. The nail art beads come in many colors and finish.

  • How To Apply Fimo Nail Art

    Applying Fimo nail art is easy and a great way to create fun nail art design.  Fimo usually are in a cane/bar shape. For nail art, you need to slice it according to the thickness you want. Slicing fimo can be time-consuming and challenging. Therefore, we offer pre-slice fimo nail art shape for quicker and easier application. You can get them in a bag orin a wheel.

  • Crackle Nail Polish Tips & How-To

    Crackle nail polish has become the must-have polish for any nail fans. It's been a while now but still popular. If you want to know the basic how-to apply or may be have problems in applying crackle polish. Keep reading.

    Crackle Gold 24K Gold over dark polish

    Photo above: Crackle Polish 24K Gold over dark polish.


    Applying crackle nail polish is easy. If people find it difficult to use, maybe they don't know the trick and tips. Below are some crackle or shatter tips I found:

    • Choose 2 nail polish colors that really contrast for best result. One regular nail polish for the base and one crackle polish for upper layer. So choose base color that will go nicely with the top crackle polish. 
    • After applying the base polish, wait until it completely dries. It must be completely dry so the crackle polish can crack nicely.
    • Before applying, shake the crackle polish until it mixed well.
    • After applying, just wait and watch while the polish is doing its crackle magic. 
    • Usually crackle nail polish dries matte and chips easily. You need top coat to make it shine and long lasting.
    • For fine and small crackles, apply thin layer. And for bigger crackle, go thicker. Basically the thinner, the more cracks you have.

    Alright I hope this is helpful so you can have fun with crackle or shatter nail polish. If you want to know where you can buy crackle nail polish, Esther's Nail Center has LaRosa Crackle Nail Polish for $5 a piece, with 18 colors and a crackle top coat. The most popular colors are black, white, gold and silver. Larosa crackle polish works great and cracks relatively fast. No need for other expensive brand shatter nail polish.

    Buy Crackle Nail Polish

  • Gel Nail Polish at Home Tips & How To

    Are you looking for a new gel nail polish system to try at home and not sure what products to use and how to do it? Great, because here I'd like to show you the how-to and tips for doing gel polish at home.

    Doing Gel Polish at Home? Really?

    Gelish Gel Polish

    The idea of getting your gel nail polish done at home is very reasonable since applying gel nail polish is getting way easier now and it will save a lot of money too. No more electric drill or strong-odor chemical. Gel polish nowadays are like regular nail polishes in regular bottles without the painstaking steps. Some brands I am going to talk about are CND Shellac, Gelish, and Daisy Gel, because these 3 are available at Esther's Nail Center.

    The first thing people usually ask is which gel polish should I choose, CND Shellac or Gelish? In my opinion for doing gel nail polish at home, I would suggest Gelish over Shellac Nails just because it's easier to use, less problematic, more economical and more colors collection. Daisy Gel is another brand that works like Gelish with less price, so it's great to try at home. 

    Daisy Soak Off Gel

    Another way to find out is to try both CND Shellac and Gelish. Then see which one stay nicely on your nails as everyone has different nail condition.

    Below are the instruction for doing gel nail polish at home with Gelish or Daisy Gel. CND Shellac has different method and will be shown in another article.


    Gel Nail Polish at Home Step-by-step

    Gel Products

    Gelish Gel Polish System

    1. Gel base coat such as Gelish Foundation Base Gel or Daisy Gel Base Coat
    2. Gel top coat such as Gelish Top It Off or Daisy Gel Top Coat
    3. Gelish Cleanser (blue liquid), 4 or 16oz
    4. Gel nail polish such as Gelish Soak-off Polish or Daisy Gel Nail Polish with your choice of color
    5. Tunnel-model, 36-watt UV lamp
    6. Nail bonder such as Gelish phBond or Daisy Gel Ultra Bond
    7. Gelish Structure Gel if you have weak and peeling nails
    8. Cuticle Oil
    9. Lint-free nail wipes or Cotton ball

     Application

    1. Prep your nails by cleaning the nails or removing old nail polish
    2. Push back the cuticle and clean the surrounding nail plate
    3. Shape the natural nail with your nail file (recommended grit 240/240)
    4. Buff nail lightly with the course side (100 grit) nail buffer
    5. Remove the dust and wipe the nail with Gelish Cleanser (blue liquid) with a lint-free wipe or cotton
    6. (Optional) Apply a coat of nail bonder. Wait until it dries. The purpose for applying the nail bond is for optimal performance, to increase the bonding between natural nails and the gel polish
    7. Apply gel polish base coat in a thin application and seal the edges of the nails. Make sure the gel doesn't touch the cuticle. If it does you can wipe it off with wood cuticle stick.
    8. Place hand (all fingers) in the UV Lamp for 1 minute setting. 
    9. Using clean dry nail wipe, remove tacky surface of the base coat.
    10. Apply gel polish color in a thin application from cuticle to free edge. Be sure to seal the edges
    11. Place hand in an UV light for 2 minutes for dark colors or 1 minute for light colors
    12. For darker coverage, repeat step 10 & 11
    13. Apply gel polish top coat from cuticle to free edge using a thin light application.
    14. Place hand in UV Lamp for 2 minutes.
    15. Wipe of tacky surface with Gelish Cleanser (blue liquid)
    16. Apply cuticle oil to the skin surrounding the nail.

    Here's a video on Gelish application with Gelish Polish Jet Set. Video taken from Juicy Nails & Makeup blog.

    Gel Polish at Home Tips

    • Any brand of 36-watt UV Lamp works as long as it has a tunnel model with 36 watts bulbs (4 of 9-watt bulbs). Some have switch on the back some on top. I prefer on the top just because it's easier to reach the buttons. I also prefer UV Lamp than LED Light because with UV Lamp I can use other gel nail polish from other brands in case I want to. The drawback is just you have to change the bulbs every 6 months or so.
    • If you are concerned with UV Light you can apply sunblock on hands or wear the UV Lamp fingerless gloves before application
    • Get a yourself a nice and handy cuticle oil, like this cuticle oil pen, because you often need to keep the nails moisturized as using gel polish can be dehydrating.
    • You can do a fill maintenance to fill in the nail growth near cuticles are. It has the same steps as the application above.

    So what do you think about giving it a try? I would like to know your experience. Feel free to email us at info [at] esthersnc.com. Also read other articles about how easy the gel nail polish removal is and the fill-maintenance application.

    ---------

    Esther's Nail Center is a nail store for people who want to get their nails done at home. We offers gel nail polish brands such as CND Shellac nail polish, Gelish Gel Polish, and Daisy Gel Polish. They are in the range price of $20.95 to $11.95 with Daisy Gel being the least expensive one. Check out also our manicure pedicure supplies for your nail polish application at home.

    Application instructions are provide by Gelish manufacturer, Nail Harmony.

  • How to Apply CND Shellac Nail Polish

    Recently I was blessed to participate in a CND Shellac Workshop because I got ‘shellacked’ by an experienced CND Education Ambassador, Michele Huynh.

    She did a demonstration on how to apply and remove CND Shellac nail polish.  Her application was flawless and removal was a breeze.  My nail (only one nail got done) looked great. Unfortunately, I didn’t get a chance to know how long it would stay since my shellac was removed the same day…:-(..It had to, so I can show you all on how to remove Shellac.

    Alright, let’s continue on how to apply CND Shellac. Also beware this is a heavy-picture article.

    1. File edge of the nail with 240-grit nail fileto shape the nail. With CND Shellac, you would never file your nail bed.

    how to apply shellac nail polish file nail edge


    2.  Push back and clean cuticles with cuticle pusher. Notice that this is a dry manicure.

    how to apply shellac nail polish - push cuticle


    how to apply shellac nail polish - push cuticle


    3. Cut any hang nails or cuticle if necessary with cuticle nipper.

    how to apply shellac nail polish - cut hang nails


    4. Wipe clean nail with lint-free nail wipe soaked with CND Scrubfresh.

    how to apply shellac nail polish - apply scrubfresh


    5. Shake, shake vigorously the CND Shellac Base Coat so the ingredients mix well.

    how to apply shellac nail polish - shake shellac base coat


    6. Apply a thin coat of CND Shellac Nail Base CoatThe key to get a good result is to apply every layer thinly, said Michele.

    how to apply shellac nail polish - apply shellac base coat


    7. Cure under 36-watt CND Shellac UV Lamp for 10 seconds. Make sure your middle finger touch the end of the tunnel before starting the process.

    how to apply shellac nail polish - cure under 36 watt uv lamp


    8. Apply a thin layer of CND Shellac nail polish. In this case, I used Rock Royalty. And cure for 2 minutes under Shellac 36-watt UV lamp. To clean the messy polish application on the cuticle or skin, just use the wood cuticle stick to wipe clean. Do it before curing the polish.


    9. Apply another thin layer of CND Shellac nail polish. And cure for 2 minutes. If necessary, you can apply an extra layer for dark coverage.

    how to apply shellac nail polish - apply thin color


    10. Apply a thin layer of CND Shellac Top Coat. And cure for 2 minutes.

    how to apply shellac nail polish - apply thin top coat


    11. Wipe clean the nail with lint-free nail wipe soaked with 99% Alcohol. It has to be 99% Alcohol. If less than 99% it won’t show the full shine. After wiping, the polish should be dry, hard and not tacky.

    how to apply shellac nail polish - wipe alcohol


    12. Apply and massage CND Solar cuticle oil on nails. And here’s  CND Shellac nail polish Rock Royalty.

    cnd  shellac rock royalty

    cnd  shellac rock royalty


    I also asked her some questions I often heard regarding CND Shellac application. To keep it short, I’ll just post the answer below:

    • It’s not uncommon to hear customers complain about her nails getting dry after using CND Shellac. Michele suggests to use CND Solar Oil every day to combat this problem. If Solar Oil is used often, there shouldn’t be problem of dry or splitting nails.
    • Regarding nails that are not cured properly, check the bulbs. Perhaps one of the bulbs is out. Also on CND Shellac 36-watt UV lamp, you can press the Reset button to see how many hours left for the current bulbs. Also shake, shake shellac coats or polish to make sure the ingredients mix well.
    • Her choice for French Manicure is Cream Puff or Studio White (an off-white) for the white tip and Clearly Pink and Romantique (more opaque) for the pink. Here’s her French Manicure with Studio White and Clearly Pink.cnd shellac french manicure
    • Using less than 99% Alcohol won’t show the full shine of Shellac. Make sure when buying, you get only the 99% Alcohol.
    • For customers with weak or splitting nails who want to use Shellac nail polish, she advices to use Brisa Gel as a foundation before using Shellac. The purpose is to strengthen the nails before applying Shellac.

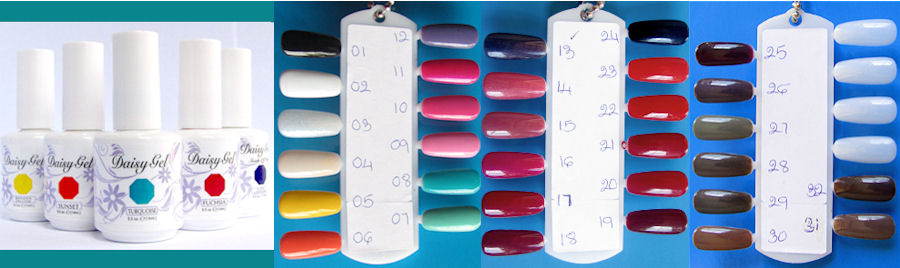
    Finally, take a look at these photos on Shellac colors and products that were used.

    I noticed using pump bottles like these make application process less messy and easier.

    shellac nail products used

    CND Shellac Moonlight Roses over Asphalt. Michele was sporting this color. If you like this color, take a look at other photos above. Those purple nails are hers.

    cnd shellac asphalt moonlight roses

    That pretty red nail is Red Baroness. Two coats with CND Top Coat.

    cnd shellac red baroness


    You can get all these products at Esther’s Nail Center. We have all new CND Shellac Fall 2011 colors in-stock. Check us out.

  • Nail Art Stamping Tutorial

    Do you know that Esther's Nail Center have nail art stamping set? Yup, we just have them in-store, the stamp, scraper and image plates set. So, where is the nail polish for stamping? Here's a trick you need to know beside others that you'll find out if you keep on reading: you actually can use any nail polish as long as its color is opaque enough.

    For other useful tips and tricks and answers to common questions you may have regarding nail art stamping, I add to this post a video tutorial from our favorite blogger Asami from Nails by Asami. She will explain about what can and cannot be used as a stamping polish, as well as how to do double-color stamping and selective stamping.

    So enjoy the video and I hope you find it helpful!