
Tutorial on how to use glitter nail sticker that covers the whole nail plate. This step-by-step tutorial will show you how easy it is to apply and remove the nail cover sticker, make it a favorite to use whenever time is short but good-looking nail is important.

break
The following photos and tutorial are provided with permission by Asami from Nails by Asami Blog. Nail sticker used in this tutorial is available on the Glitter Nail Sticker page.
While I do enjoy creating designs from scratch, several times a month I opt instead for plain color or nail stickers to give myself a break from the time and effort that's involved in handpainting nail art. I'm a big fan of nail stickers in general and I buy quite a few myself whenever I find cute ones; they're the fastest way to get intricate embellishments on without any other needed supplies.
Recently I was sent a type of nail sticker that I've never seen before, designs made out of glitter that are meant to cover your entire nail plate. If you've ever tried those dry nail polish strips from Avon, Sephora or Incoco, these work in a similar fashion but are composed of glitter and have cute designs integrated onto the sticker itself.
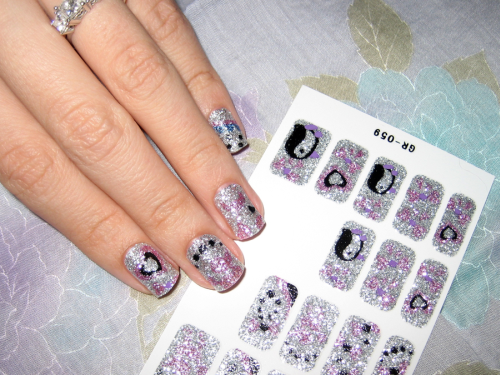
My overall favorite thing about these is how fast they are to put on; the whole process only takes a few minutes and there is no drying time unless you choose to add a clear topcoat. Compared to the hour or two I normally spend on nail art, these are a breeze. There are plenty of stickers on a sheet and I have enough left for another two manicures so I'll be saving what's left for a time when I'm in a rush and need something cute on my nails quickly.

The first step in applying glitter nail stickers is to clean your nail plate by running a cotton swab dipped in nail polish remover over your nails. It only takes a second, and it can really extend the life of your manicure because stickers will adhere better to nails that are free of natural oils or hand soap moisturizers.

Simply place a sticker against your nail. I like to pick up all my nail stickers with tweezers because again, it keeps my skin's natural oils from touching the back of the sticker so the adhesive can remain as sticky as possible. I also think it's easier to place a sticker successfully when it's held with tweezers. Push on the sides of the sticker to conform it to the curves of your nail. These are very thin and stick well if you apply a little pressure. Using small cuticle scissors, trim off any excess.

The only downside to stickers that are meant to cover your entire nail is that they might not perfectly fit everyone's nail shape, but when you're after a quick and simple process I think perfection isn't usually the main concern. As you can see, my cuticle curve is quite rounded, while these glitter nail stickers are almost square shaped, but once it's on you can't really tell and certainly from a normal distance it would not be noticeable if they didn't perfectly match up.
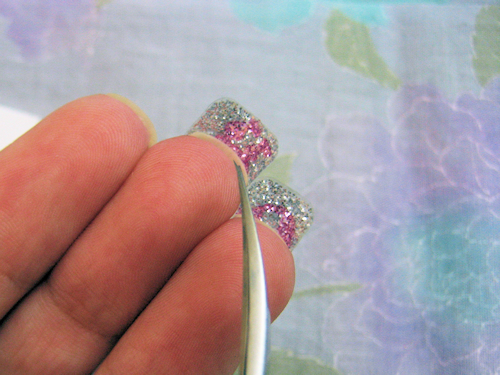

It's easier to trim the excess if you view your nails from the underside. Keep any extra you trim off, because after being cut they are the perfect shape for glitter French tips. Just place any extra back on the paper and later on you can use them for a glitter French manicure. (If your nails especially long, you might not have enough extra left for this, but the stickers have a good length to them so I think most people should.)

When you're finished, if you like you can add a coat of clear topcoat to make your glitter nail stickers stay on longer. I'd recommend wrapping your tips to give the edge of the stickers a little added protection
I mentioned at the beginning of this post that my favorite thing about these was the short time it takes to apply them, but definitely a close second is the fact that they are even easier to remove. I'm sure you all dislike removing several coats of glitter nail polish as much as I do, as glitter polish can be quite stubborn. I was very pleased to discover that if you place a cotton square with nail polish remover on it against these stickers, they become slick and slide right off in practically one piece.
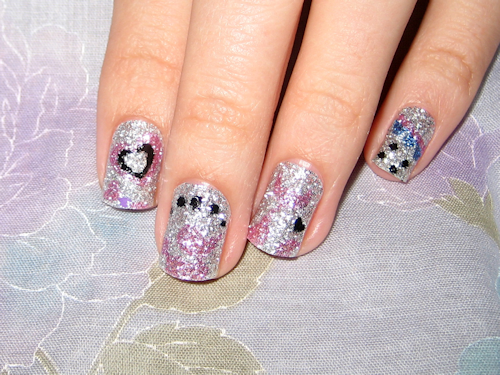
I think these would be ideal for young girls because the designs are fun and youthful and they are easy enough for girls to apply by themselves without the worry of spilling loose glitter or chemicals all over. If you have wide nails you might have an issue with a bit blank space on your thumbs in the same way that full image Konad stamping plates never completely cover my thumbs, but that's not a deal breaker for me as most people would never notice a bit of space on the sides anyway. All in all these were really fun to apply and I love penguins!
A big thank you to Esther's Nail Center for kindly sending me the glitter nail stickers I used in this post. They have seven different styles available for $3.99 each, with thirty stickers of varying sizes on each sheet. Get the glitter nail stickers now!