
With Halloween's around the corner, here are a few ideas on adding some spookiness to your nails for Halloween nail designs. I've compiled these simple yet cute designs from around the net. I hope you'll find them useful.
Nail Art Tools
If you like to freehand your Halloween nail art, you will need some nail art supplies such as nail polish with Halloween's classic colors and nail brush. You may also use Halloween nail stickers or nail gem stones to make your design more attractive. The nail polish colors could be orange, black, yellow or white. Glitters are also great!
.jpg)
One great tool to freehand especially is Nail Art by Adoree. This thin-bottle nail polish (shown in the photo with silver glitter) has a thin, striper brush so you can paint your design more accurate.
Halloween Nail Stickers
Nail Sticker is a popular choice to get that scarry look on your nails easily and quickly. Just peel and stick it to your nail. At Esther's Nail Center, we have Halloween themed (below) or Glow in the Dark nail stickers.

How to apply nail stickers:
1. Select and place the selected design on your nail where you want.
2. Gently press down the selected design on your dry polished nail.
3. Apply top coat to seal the design.
Halloween Nail Art
Need a little more challenge? Let's try some bootiful designs below.
1. Floating Eyes and Spider
Source: Bewitching Nails
Level: Easy to Intermediate
What you'll need: black, white, and yellow nail polish.
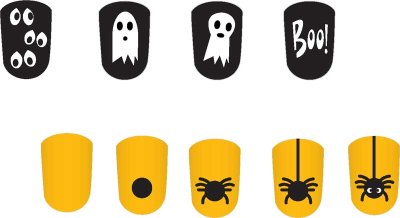
Floating Eyes Instructions
- Paint fingernails black. Allow to dry.
- Using white paint and dotting tool, paint two pairs of small ovals on each nail. Allow to dry.
- Using black paint and dotting tool, paint a small dot on each of the white ovals. For fun, place the dots in a different place on each set of eyes so it appears that these "eyeballs" are looking off in different directions.
Spooky Spider Instructions
- Paint all fingernails yellow. Allow to dry.
- Using black paint or nail polish, paint a small circle in the bottom center of each nail.
- Using black paint and a toothpick, add the spider's legs by painting 4 short lines on each side of the circle.
- Paint a thin black line from the top of the nail to the spider's body. This is the spider's "web." Allow black paint to dry.
- Using white paint, paint two small crescents on the spider's body for eyes.
2. Happy Ghosts
Source: Nails by Asami
Level: Intermediate
What you'll need: black, white and dark red nail polishes.Detail brush for painting. Rhinestones are optional.

Instructions
These little ghosts are happy in their own creepy little way. Since they're very simple, they've been applied over some vertical stripes to make the overall design more interesting.
- Paint your full nail in any red nail polish. (Or purple, or orange, etc.).
- Then take a black nail polish and drag out two vertical stripes down your nail.
- Use white acrylic craft paint and a small rounded paintbrush to apply your ghosts.
- Use the same paintbrush and black acylic paint to draw on their happy little faces.
- Apply a few red gemstones if you have them, otherwise just seal with a clear topcoat.
3. Halloween Pedicure
Source: Toerrific
Level: Easy to Intermediate
What you'll need: black and orange nail polishes. Yellow rhinestones.
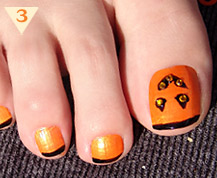
Instructions
- Apply a clear base coat, and then a couple of coats of bright orange nail polish. Make sure that orange polish is not too transparent.
- With black nail polish and paint brush, draw a face with triangular shaped eyes and a mouth. For the eyes draw the dots first and then add pointy strokes at the top.
- For more contrast add a black French Tip.
- Place yellow rhinestones over the eyes and mouth of your toe-pumpkin. The rhinestones will shine just like candles.
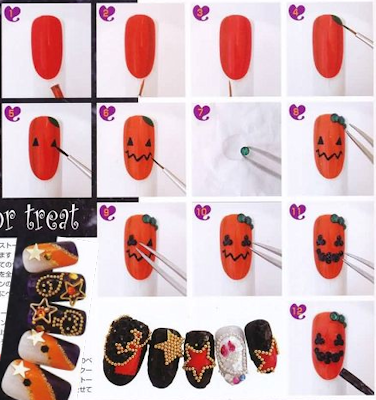
4. Jack-o-Lantern Super Cute Nail Design
Source: Nail Max Oct 09
Level: Intermediate to Advanced
What you'll need: orange/coral nail polish, nail art by adoree polish in black or detail brush and black nail polish. Green and black round rhinestones. Additionally, you'll need gold bullion beads to outline a design or form a shape you like. Aren't they scarily cute?
Step-by-step instruction shown in the picture below.
All nail art supplies mentioned here are available at EsthersNC.com. Check our great selection of nail art brush, nail art gem stones and nail stickers.
So what Halloween nails you are wrearing this time? Share your design with us by submitting your photos to info (at) esthersnc.com. Happy Halloween!